
Every time someone shares your link, social platforms decide how it looks. By default, the result can be ugly, blank, or completely wrong. The fix is simple — you need to add Open Graph tags to your website.
Tags tell Facebook, LinkedIn, X (Twitter), and other platforms exactly what title, description, and image to display. So your shared links look polished, branded, and clickable everywhere.
This step-by-step guide explains what they are, why they matter, and how to add them in minutes — even without code knowledge.
What Are Open Graph Tags?
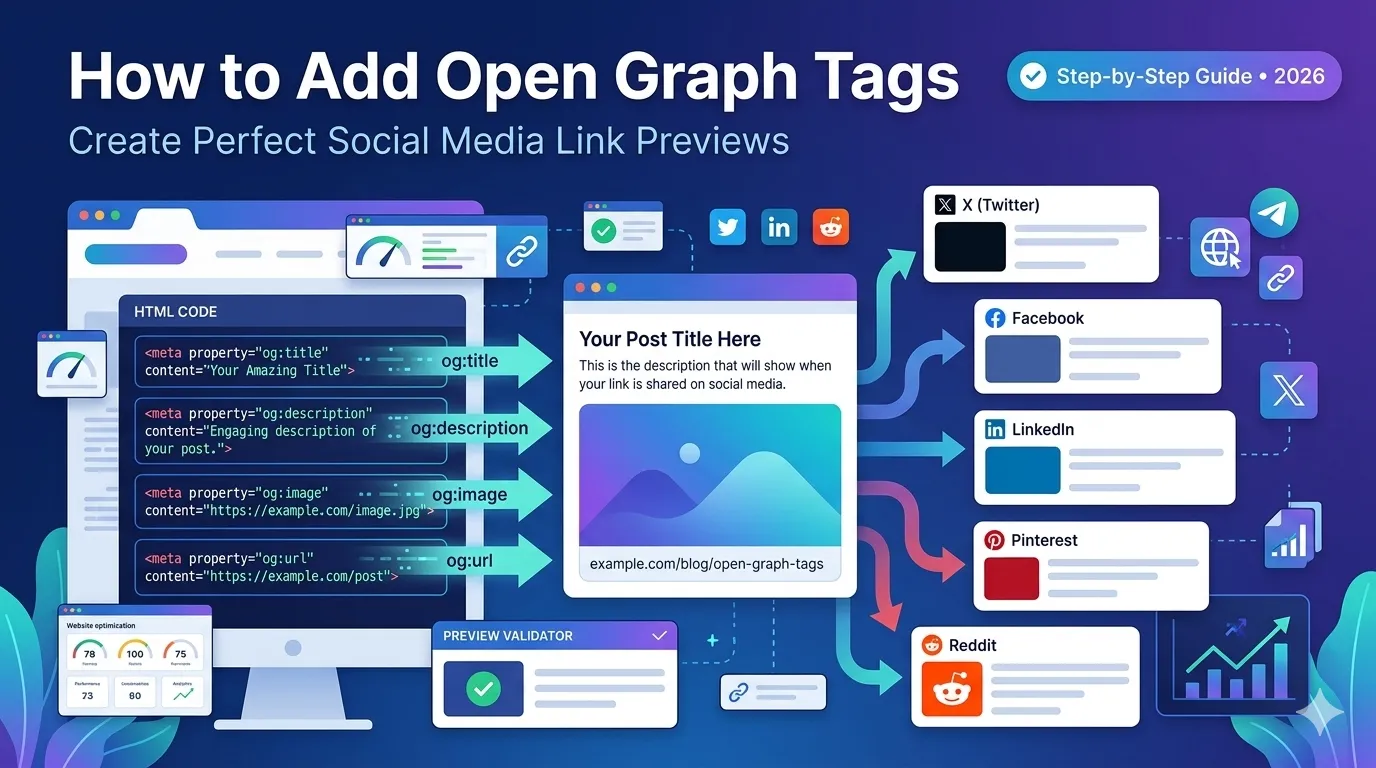
Open Graph tags are special meta tags placed inside the <head> section of your HTML. Facebook originally created them in 2010, and almost every social platform now supports them.
They control how your link looks when shared, including:
- Title shown in the preview
- Description below the title
- Image displayed in the card
- URL and site name
So OG tags give you full control over your brand’s appearance in every shared post.
Why You Should Add Open Graph Tags to Your Website
Adding these tags is more than a technical task. It is a smart marketing move. Here is why it matters:
- Higher social click-through rates
- Professional, branded link previews
- Improved trust and credibility
- Better visibility across feeds
- Stronger SEO signals through engagement
Therefore, even a small OG fix can deliver bigger marketing returns instantly.
Essential Open Graph Tags to Include
You do not need every OG tag in existence. Stick with these essentials:
| Tag | What It Does |
|---|---|
| og:title | Sets the share title |
| og:description | Sets the share description |
| og:image | Sets the preview image |
| og:url | Sets the canonical URL |
| og:type | Defines page type (article, website, etc.) |
| og:site_name | Adds your brand name |
Add these six tags to every page for clean, consistent sharing.
How to Add Open Graph Tags to Your Website (3 Methods)
You can add OG tags in different ways depending on your site setup. Pick the one that fits you.
Method 1 — Manual HTML
Paste the following snippet inside the <head> section of your HTML:
<meta property="og:title" content="Your Page Title">
<meta property="og:description" content="Short, clickable summary">
<meta property="og:image" content="https://yoursite.com/image.jpg">
<meta property="og:url" content="https://yoursite.com/page">
<meta property="og:type" content="article">
<meta property="og:site_name" content="Your Brand">
Save the file, and your OG tags are live.
Method 2 — Use a Free OG Generator
The easiest method is to use our free Open Graph Generator. Enter your title, description, and image — then copy the auto-generated code.
It takes less than a minute, and you do not need any developer help.
Method 3 — Use a WordPress Plugin
If you use WordPress, plugins like Yoast SEO or Rank Math handle OG tags automatically. Just fill in the social fields inside each post.
This is perfect for non-technical users who manage content daily.
Best Practices for Open Graph Tags
Avoid rookie mistakes by following these proven OG best practices:
- Keep og:title under 60 characters
- Keep og:description between 110–200 characters
- Use 1200×630 px images for best results
- Use HTTPS URLs for og:image and og:url
- Match og:url to your canonical tag
- Test images on real platforms before publishing
These small habits make a huge visual difference in feeds.
Open Graph vs Twitter Card Tags
X (formerly Twitter) uses its own version of OG, called Twitter Cards. They are similar but use slightly different tag names like twitter:title and twitter:image.
Luckily, X falls back to Open Graph tags if Twitter Card tags are missing. So OG alone often does the job.
How to Verify Your Open Graph Tags
After adding OG tags, always test your link preview. Use these free validators:
- Facebook Sharing Debugger
- LinkedIn Post Inspector
- X Card Validator
- Our free Open Graph Checker
Validation prevents ugly broken previews on launch day.
Common Open Graph Mistakes to Avoid
- Forgetting og:image (most common issue)
- Using low-resolution or tiny images
- Mismatching og:url with the actual page URL
- Adding multiple og:title tags by mistake
- Ignoring cache — old previews can stay cached for days
Fixing these issues instantly improves how your brand appears online.
Boost Sharing Results With Smart Tools
Combine Open Graph tags with these helpful free tools for maximum impact:
- Open Graph Generator — build clean OG code
- Open Graph Checker — verify previews live
- Image Compressor — keep OG images lightweight
- Title & Meta Length Checker — perfect lengths for SEO
Used together, these tools turn every social share into a branded marketing asset.
Final Thoughts
Knowing how to add Open Graph tags to your website is one of the easiest SEO and branding wins out there. It takes minutes to set up and pays off every time someone shares your content.
Start now with our free Open Graph Generator and validate the result with our Open Graph Checker. Your shared links will look pro from day one.
FAQs
Place the OG meta tags inside the head section of your HTML. You can also use a free generator or a WordPress plugin.
1200 by 630 pixels is the recommended size. It looks great on Facebook, LinkedIn, X, and most modern platforms.
Indirectly. They boost click-through and engagement on social media, which strengthens overall SEO signals.
Social platforms will guess. Previews can show wrong titles, no image, or random content from your page.
Not always. X uses Open Graph as a fallback, so OG alone covers most cases unless you want Twitter-specific cards.
Facebook caches OG data. Use the Sharing Debugger and click Scrape Again to force a fresh refresh.
Yes. Add OG tags inside that page’s head section. They apply only to that specific URL.