
Need to blur parts of photos for privacy before sharing publicly? You’re tapping into one of the most important photo skills in 2026. Whether hiding faces, license plates, addresses, or sensitive documents, blur tools protect privacy while letting the rest of your photo shine.
This guide walks through the easiest blurring method online, explains different blur types, and shares pro tips for natural-looking results. By the end, you’ll handle photo privacy like a pro.
Why Blurring Photos Matters for Privacy
Photos expose more than people realize. Backgrounds show home addresses. Bystanders appear without consent. License plates reveal vehicle details. Documents may include personal information visible to anyone who zooms in.
Furthermore, GDPR and privacy laws often require hiding identifiable information before publication. News organizations blur faces of minors. Real estate agents blur house numbers. Businesses obscure customer data in case studies.
Common Privacy Use Cases
- Hiding faces of children or bystanders in public photos
- Obscuring license plates before posting vehicle pictures
- Blurring addresses in real estate marketing material
- Covering account numbers in screenshots
- Hiding sensitive text in document scans
- Protecting employee identities in case studies
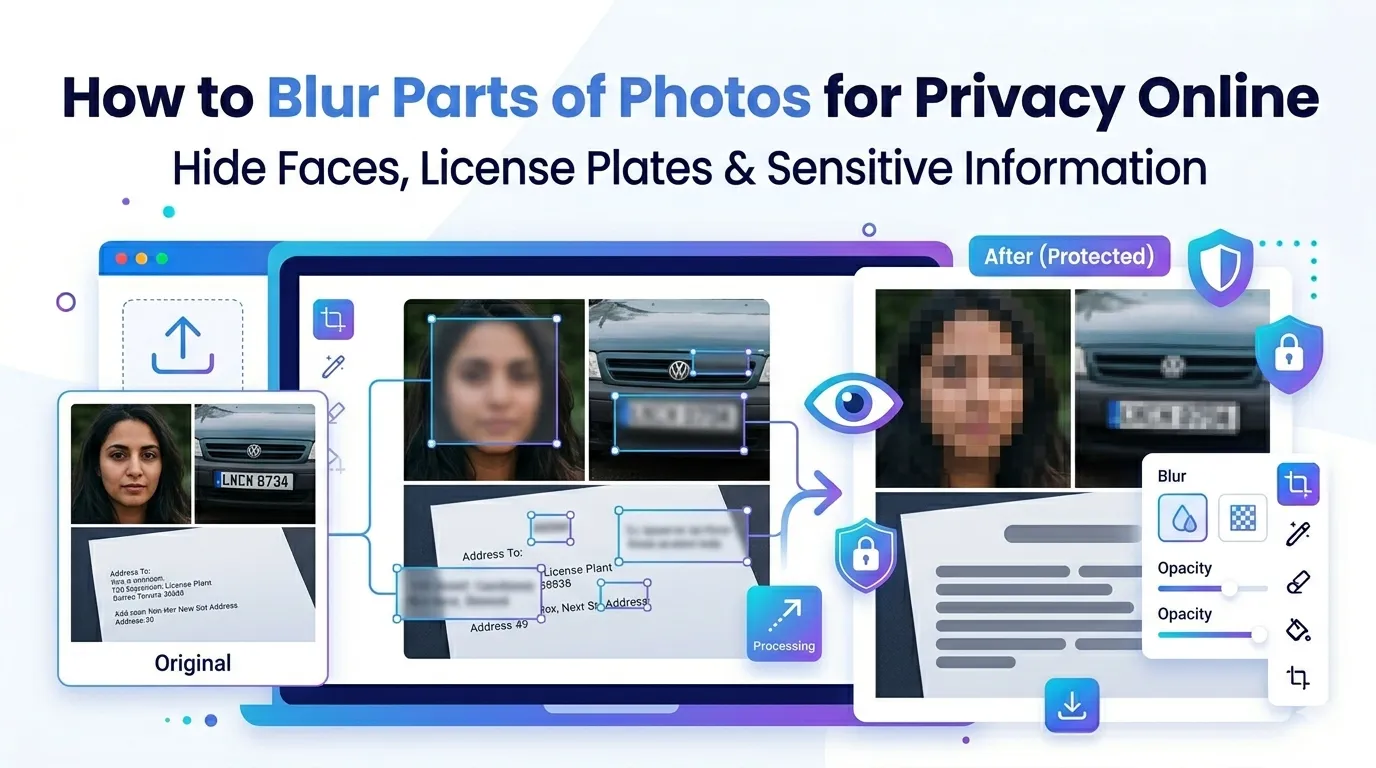
Step-by-Step: Blur Photos Online
Browser-based blur tools handle privacy edits in seconds. No design software required for basic privacy work.
Step 1: Upload Your Photo
Visit our Photo Blur tool. Drag your image into the upload zone. Common formats like JPG, PNG, and WebP work without issue.
Step 2: Select Areas to Blur
Drag boxes over the areas you want blurred. Most tools support rectangular, circular, or freeform selections. Set blur intensity to match privacy needs. Stronger blur protects better but looks more obvious.
Step 3: Download Protected Photo
Apply the blur and download the result. The protected photo retains all original quality outside the blurred areas. Share with confidence knowing sensitive details stay hidden.
Different Blur Types Explained
| Blur Type | Best Use Case |
|---|---|
| Gaussian blur | Smooth privacy on faces and text |
| Pixelate | Censoring license plates and IDs |
| Motion blur | Stylistic privacy with movement feel |
| Mosaic | Strong privacy on documents |
| Box blur | Quick censoring with sharp edges |
Tips for Effective Privacy Blurring
Smart habits prevent privacy leaks. First, blur strongly enough to prevent reverse-engineering. Light blur can sometimes be reversed by AI tools. Heavy pixelation or mosaic effects offer better protection.
Second, check the full image after blurring. Reflective surfaces, mirrors, and shop windows sometimes reveal information you tried to hide. Third, save flattened JPGs rather than layered files. Layers may preserve the original data underneath blur layers.
Common Privacy Mistakes to Avoid
- Blur too light: Modern AI can sometimes reverse weak blur
- Missing reflections: Check windows, mirrors, and shiny surfaces
- Saving layered files: Flatten before sharing to prevent recovery
- Skipping metadata: Strip EXIF data that may reveal GPS coordinates
- Forgetting context: Other photos may identify what you tried to hide
Blur vs Censor Bars: When to Choose Each
Both methods hide information. Blur looks more natural and lets some context remain. Solid black bars guarantee total privacy but interrupt the visual flow more aggressively.
For social media and casual sharing, blur often works better. For legal documents or maximum protection, solid black bars eliminate any reversal risk. Pick based on your specific privacy needs.
Privacy When Uploading Sensitive Photos
Photos with sensitive data need extra care during processing. Pick blur tools that handle files in your browser. Images stay on your device, preventing exposure during the privacy protection step itself.
Always read the privacy policy. Reputable services delete uploads quickly. Avoid platforms requiring account creation for one-off privacy editing tasks involving documents or personal photos.
Combining Blur With Other Privacy Tools
Blur fits into broader privacy workflows. Crop sensitive context out first using our Image Cropper. Remove backgrounds entirely via our Background Remover when context is the privacy risk.
Strip metadata before sharing by re-saving through our Image to JPG converter. Each tool tackles a specific privacy need, and together they cover comprehensive photo protection.
When Blurring Isn’t Enough
Blur protects against casual viewing but not advanced reversal. For maximum security, replace sensitive areas with solid colors. Crop out entire backgrounds rather than blurring partial details.
For legal documents or critical privacy needs, consult professionals. Online tools handle everyday privacy editing well. Save expert services for situations where reversal could cause real harm to identified people.
Protect Privacy While Sharing Photos
Privacy matters more than ever in 2026. The right blur tool protects identifiable information while letting the rest of your photos shine. Whether you’re sharing on social media or publishing professionally, smart blurring keeps people and details safe.
Try our Photo Blur tool today. Free, secure, and ready whenever sensitive details need to disappear before your photo goes public.